
Chrysocolla was not the main focus in 1899 when Jack Rowley discovered an outcropping in the middle of Maricopa County, Arizona, which turned out to be a gold-bearing copper vein. Over the years, many copper minerals were mined there, including gold, wulfenite and lead.
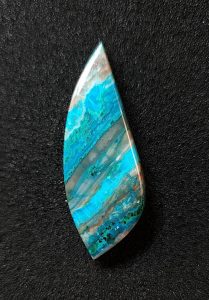
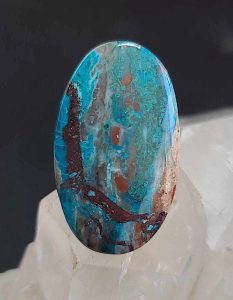
Chrysocolla had always been present, but it was never the miner’s main focus to dig. It still wasn’t until just a couple of years ago, when miner, Ed Davis Jr., unearthed a solid, silicated chrysocolla from the mine. This mix of copper minerals is reminiscent of the Inspiration Mine chrysocolla. Much of what has been dug out has a beautiful color array of blues, greens, reds and yellow, plus a really nice strata pattern.
How to Purchase Chrysocolla Stone Slabs
To obtain some of this material, Ed Davis Jr. can be easily found on Facebook, where he posts available slabs.
As with many types of chrysocolla, some may not be very good to cut or cab, unless it is stabilized first. However, this Rowley Mine chrysocolla is very stable and solid since it’s silicated and contains a fair amount of quartz and even trace amounts of gem silica.
 Starting to Make a Cabochon
When starting the trimming process of your preforms, do a small bench test and gently flex the slab to be sure there are no hidden fractures before starting to make your first cuts on the saw. It’s always best to find a fracture, if it exists, beforehand rather than after starting the cabbing process and the cab splits in half.
Once all your preforms are trimmed out and ready to cab, this chrysocolla is sturdy enough to start on an 80-grit steel wheel to trim out your design and dome the top. Once the cab is roughed out, I like to move to a 140 or 220-grit soft resin wheel. This step will quickly smooth out all the major scratches left from the course steel wheel and will set up an easy routine with the polishing stages.
When you move onto the 280-grit stage, this is where you want to stop occasionally and dry the cab off to examine for any remaining scratches. Most lapidaries like to keep a dry towel handy to wipe off the stone, but I like to keep a can of dust remover by my machine. A quick spray of air will reveal any scratches that need to be addressed before moving forward.
 Finishing the Project
From this point, the rest should be rather easy, utilizing the 600 and 1200-grit wheels to start the polishing stages and end on either a 3k or 8k-grit soft resin wheel. If you want to obtain a high mirror polish, you can gently move up to the 14k-grit wheel, but go slow, and give the stone time to rest. Polish for a short spurt, then allow it to cool for a minute or two and continue polishing. Many porous stones, especially chrysocolla tend to heat up internally because of the friction of the polishing wheels, even though there’s sufficient water running. It’s always best to allow the cab to cool and not heat up too much and start surface fractures.
Once you’ve finished on the cabbing machine, you can polish this material with cerium oxide on a leather buffing wheel or use Zam polishing compound on a felt Dremel tip. This will bring out a super nice high gloss finish.
This story about chrysocolla previously appeared in Rock & Gem magazine. Click here to subscribe! Story and photos by Russ Kaniuth.


