
When you know how to build a rock water fountain, trickling water and birds softly chirping are two of nature’s most relaxing sounds you’ll hear daily. Here’s everything you’ll need to know to design, build and care for an above-ground, rock water feature in your yard or garden.
Most in-ground fountains require professional design, installation and maintenance. This DIY how to build a rock water fountain was inspired by one of those fountains, a four-foot diameter rock fountain surrounded by boulders, at the riverboat port dock outside of Bamberg, Germany.
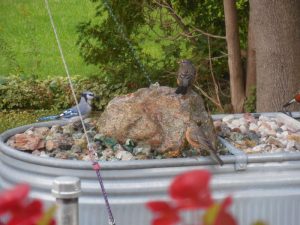
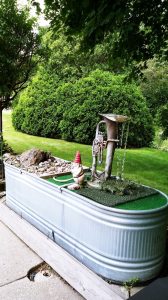
My husband, John, took that concept and downsized it into the above-ground rock fountain we now enjoy in our backyard. Our display has two water features, so we chose a large stock tank to accommodate two of everything as each feature needs its own pump and wiring.
Here are the basic plans for how to build a rock water fountain using a rock approximately 12” x 12” x 18” (weight approx. 100 pounds or less) and a 90-gallon stock tank, preferably with a threaded drain plug for easier maintenance.

How to Build a Rock Water Fountain: Finding the Right Rock
First, you will need to secure a proper rock for how to build a rock water fountain. For us, Wisconsin’s State Rock, red granite was perfect. Any hard rock or boulder will do—agate, quartz, jasper or even limestone—just find a rock whose size and shape strikes your fancy.
You may already have the perfect rock in your yard, but if you need to find the centerpiece of this project, here are a few ideas on how to secure one. Never take a rock from private property without asking. State and National Parks are also off-limits, but many public beaches or rivers may have a nice, rounded specimen just right for the job. In northern farm country, rounded boulders are often pushed up by frost each winter. If you see a pile of rocks near a farm, you might ask at the farmhouse if you can help yourself or offer a small payment. If all else fails, you can purchase ‘the rock’ at a local quarry, landscape or garden center, but be prepared to pay anywhere from twenty cents to a dollar per pound.
Next Steps
For the next step in how to build a rock water fountain, it’s time to decide on the location for your water feature. Remember that your finished fountain will need maintenance from time to time and will require a power source to run the pump. Do you have trees or other plantings that will deposit debris, or grass clippings into the pond? Debris clogs the pump.
List of Materials & Tools
Here is the list of the materials and tools that you’ll need.
Materials:
- 12” x 12” x 18” rock (not to exceed 100 lbs.)
- 90-gallon, stock tank with a threaded side drain
- (2) 5-gallon plastic buckets
- (4) patio blocks 1.5” x 12” x 12”
- (5) 4-foot treated wood boards 2” x 6”
- (1) Submersible Water Pump (Suggested: Newpol 660 GPH, Approximately $25 online)
- Three feet of half-inch ID Latex Tubing (latex needed for its flexibility)
- (1) half-inch plastic barbed hose connector
- (2) half-inch hose clamps
- (3) .5-cubic-foot bags of washed river rock or landscape rock (or your own finds)
- (1) .75”x 2” galvanized pipe nipple
- (1) .75” brass ball valve
- Three-inch deck screws
- Fiberglass screening to wrap the water pump (debris catcher)
- Teflon tape for pipe connections
Tools:
- Heavy-duty rotary hammer drill with a .5inch concrete drill bit (Two inches longer than the thickness of your rock.)
- Electric saber saw and drill with .5-inch, .75-inch and one-inch drill bits
- Screwdriver with head to fit deck screws
- Tape measure
- Optional cardboard template of stock tank opening
How to Build a Rock Water Fountain: Construction Directions
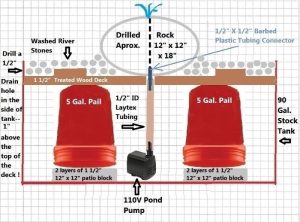
(Note: Refer to drawings, figures one, two and three for details.)
- With the rotary hammer drill, drill completely through the center of your rock.
- Place your 90-gallon stock tank on level ground in the selected location. Install the .75-inch pipe nipple and drain valve in the side of the tank.
- Place your four patio blocks centered in the bottom of the tank.
- Remove the handles from the two 5-gallon pails. Drill several .75-inch vent holes in the sides and bottoms of both pails and place them upside down on top of the patio blocks in the tank.
- Attach one end of the latex tubing to your submersible pump and insert a barbed hose connector in the other end of the tubing, securing both ends with hose clamps. Set aside for now.
- Construct your 1.5-inch-thick rock support deck out of the 2” x 6” treated wood and test fit it in the tank to lie flat on top of the pails. (See Figure two. This is where the optional cardboard template may be handy. The finished deck should be slightly smaller than the tank opening for ease of installation, removal and to accommodate the pump cord.) Continue by cutting two hand-hold holes in the deck to ease installation and removal. Drill one 1-inch hole in the center of the deck for the water supply tubing to pass through.
- Once the deck fits level on the pails, remove it and place your submersible pump (wrapped in fiberglass screening and secured with large wire ties) on the bottom of the tank, centered under where the 1-inch hole in the deck will be when the deck is in place.
- Run the power cord up the inside of the tank so that it will end up between the side of the tank and the edge of the deck.
- Run the water tubing up through the 1-inch hole in the deck and lower the deck into its final position on top of the pails.
- Place your drilled rock on top of the deck and insert the end of the .5-inch barbed hose connector into the .5-inch hole at the bottom of your drilled rock. Carefully lift the rock (with the hose attached) and lower it over the 1-inch hole in the deck.
- Drill a .5-inch hole through the side of the stock tank, 1-inch above the top of the installed deck. This is the over-fill drain hole. DO NOT SKIP THIS STEP. Now fill in around your rock with the river rock or pebbles right to the top of the tank rim.
- Fill the tank with water until the water starts to come out of the drain hole you made in step 11. Now you can plug in the pump and enjoy your rock fountain.
Safety First
Just a word of caution when using any power tools. You may want to wear safety glasses especially while drilling your rock. Also, remember that water and electricity don’t mix. If you are using any extension cords to provide power to your fountain, be sure they are rated for outdoor use. And be sure that the outlet used to plug in the pump is ground-fault protected.
Care & Maintenance
Once you know how to build a rock water fountain, care and maintenance are the next steps. You will need to add a small amount of bleach to the water every two weeks or so. For a 90-gallon stock tank, add about one-quarter cup of bleach every two to three weeks. A rule of thumb is approximately one tablespoon of bleach for every 15 gallons of water. The goal is to keep the water fresh, and not kill the wildlife that may visit your fountain.
We also like to drain our tank once or twice each season, then refill it with fresh water to keep the birds visiting as often as possible and prevent mold from growing. You should also add some water every two to three weeks until it starts to flow out of the overflow drain hole as in step 12.
Another maintenance item is keeping the pump free of debris. This can be accomplished by loosely wrapping the pump in fiberglass screening (see step seven). If your pump gets clogged with debris, your fountain stops working and you may burn out the pump long before its usual lifetime. After several years, you may need to replace the pump as part of routine maintenance.
Winterization
In Wisconsin, the fountain season is usually mid-May to early October. If you live in a climate that freezes in winter, you will also need to winterize your fountain. This will ensure that you can enjoy your water feature for many years to come. A week or two before the first hard freeze is expected in your area, completely drain the water from the tank.
It is also a good idea to cover your fountain with a tarp and secure it with ropes and bungee cords to protect it from winter winds and snow. This is the time to also disconnect the electrical wires for the winter.
Enjoy For Years to Come
In spring, fill and flush one tank full of water before you set your fountain up for its summer run. A word of caution, if you decide to build your fountain near a kitchen window, you may find that you spend too much time watching all your feathery visitors. Now, just grab a cup of coffee or a glass of wine, take a seat on your deck or patio and enjoy!
|
|


This story about how to build a rock water fountain previously appeared in Rock & Gem magazine. Click here to subscribe. Story by Sue Eyre.


