Story and Photos by Donna Albrecht
Have you ever seen a beautiful rock that resembled food and thought, “That looks yummy”? Well, that’s the idea behind my hard rock meals.
When I start planning a meal-themed rock display, the concept is determined by a particular rock that reminds me of some type of food. Then I look for rocks to build a meal around it. For instance, the rock “dinner” shown here began with a piece of common opal that was given to me by a friend. I took one look at the top and immediately thought, “Halibut!” (I was hungry at the time.)
Not every rock I use to create the complete meal starts out looking like food, but everything I include in the meal must meet my three requirements: color, scale and shape.
Visual Appeal
I make my lapidary food creations to fool the eye, so they must be the right color, or very close. My halibut is a nice off-white, with darker lines. If I had tried to make halibut with pink or blue common opal, I could never have made it convincing. I never paint or otherwise change the colors of my creations. For the displays I’m trying to create, that would be like telling a fib.
If a rock looks like a potato but weighs 10 pounds, it is a novelty to look at, but it will never get into one of my displays. When the food items are all approximately normal serving size for the food they mimic, it makes it very easy for the viewer to buy into the fantasy.
Even if the color and scale are right, if the shape is off, it distracts from the overall impression. If there’s a flaw in a rock that you really want to use, consider trying to mask it by the way you situate it on the plate.
I call this case the “Hard Rock Café”. It features halibut, baked potato, lobster chowder, carrots and peas, wine, bread and butter, and lemon layer cake with tangerine sauce. This particular meal has been displayed at many shows, and never fails to get laughs. I love that about it.
I also showed it once at a county fair, where I took second prize for workmanship out of dozens of lapidary displays, and the Judge’s Choice gold ribbon.
Turn No Stone Away
For the halibut, I used my Covington trim saw to cut a serving-size piece out of the larger piece of common opal, and ground the edges smooth on my Genie. Then I ground the top gently with a fine grit to take off the shine. What you can’t see on the plate is the uneven edges; that’s where the peas and carrots go to hide the flaw.
The baked potato is a piece of sandstone I found in a discard pile. One side is hollowed out, making the rock worthless for lapidary, so I turned that side to the bottom. I left the surface as it was, since it made me think of a good Russet with the thick skin baked crisp. Recently, I’ve received a piece of granite that really looks like a baked potato, eyes and all. It’s a bit large to go with the halibut, so I’m saving it for another meal.
I really wanted to do a salad, but I’m sure you’re not surprised that I haven’t found any rocks that look like lettuce. I decided to try for soup. The agate I chose had colors that gave it the look of lobster chowder. I purchased the little soup bowl first, then cut the rock to fit into it, tapering the back inward to fit the slope of the bowl. I decided to leave the top rough so that everyone could see how full of goodness my chowder is.
The carrots and peas took more time than any other element of this meal! I searched and searched for carrot-colored stones that I could make thick slices from, simulating the sliced carrots you find in the frozen food section. I finally went with some hardened clay. I was able to use my grinder to turn the chunks into rounded sticks, then smooth the rough spots to reduce the chances the clay would chip or break when I cut it with my trim saw. The clay was soft, and when it was wet from the lubricant, it would wipe off on my hands while I worked it. I wish the carrots looked better, but people haven’t had any problems identifying them so far.
Challenges of Meal Prep
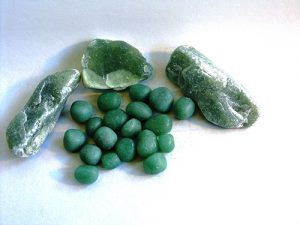
The peas were a serious challenge. Pea-colored rocks, such as good
jade, tend to be expensive. I considered jade beads, but how would I hide all those holes? I kept looking, and eventually I found a bag of landscaping “jade” (their word, not mine).
The color was close, and the chunks were an easy size to work with. I used my trim saw to cut rough cubes from the stones, a little bigger than I wanted the peas to be. I used my grinder to soften the edges, then tumbled the cubes until they looked like homegrown peas. This landscaping jade didn’t take a polish, but I think they look fine with a matte finish.
I find that the creation of convincing beverages takes a mix of whimsy and materials. I had found a smallish bag of grape garnets at a backyard sale a lapidary friend was hosting. I didn’t know what I was going to do with them then, but they were small and sparkly, so I brought them home. While I was fabricating this meal, I thought, What could be better for making wine than grape garnets? They were a little too large to be convincing, so I tumbled them down, and then polished them so the light would show their beautiful purple color.
I thought that finding bread would be a snap—no such luck. After over a year of keeping my eyes open, this little piece of chalcedony nearly hollered at me as I walked past the discard pile one day, so I picked it up. The top is dark and looks like it’s been floured, while the rest looks like dense bread. I can see why its original owner didn’t want to make cabochons with it, but I think it makes a dandy dinner roll.
The butter has been a compromise. The shade of yellow I really want can be found in some Arizona petrified wood and mookaite jasper. Unfortunately, I’ve never found pieces of either that had uninterrupted yellow areas large enough to use for a butter pat or three. I settled on a different type of jasper, but I’m not completely happy with it. I cut the pats of butter on my saw and smoothed them on my grinder. You may notice some butter wrappers on the plate. I used them to size my pats, and I hope they will help reduce any confusion people may have with my brownish butter.
One Person’s Trash….
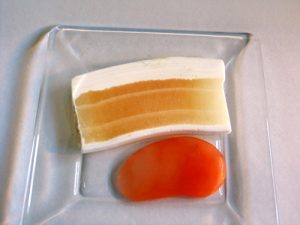
I’ll never understand why someone threw that cake-like slab away. Really! It could have made some very interesting cabochons, but the second I saw it, I knew it was my dessert. The lemon layers with the vanilla frosting were already together, and all I had to do was trim two sides and grind off the sharp edges.
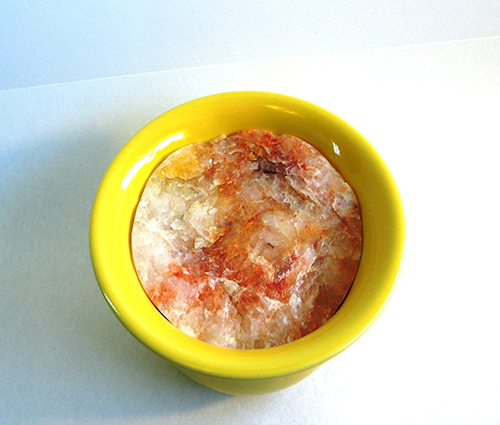
I decided to add a sauce to make the plate more eye-catching. While on vacation, I’d purchased a few pounds of orange alabaster with absolutely no idea what I’d do with it. It turned out to be perfect for making tangerine sauce. I cut a relatively thin slice, shaped it, and ground down a thick area toward the center, then arranged it on the plate like a smear, like chefs do on cooking shows.
Completing the Image
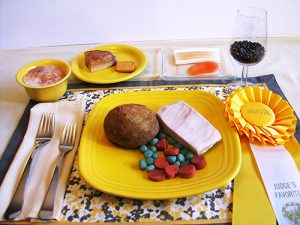
While I believe my food items are pretty convincing, putting them into context completes the display.
My first consideration in staging the meal was color. I’d be using a table setting and I wanted a color scheme that would be attractive, without drawing attention away from the food. I chose yellow and gray as my colors. The first item I chose was the gray, yellow and white placemat. Then I got some coordinating pale-yellow fabric for the tablecloth and napkin, which I sewed. If you’re not into sewing, you could certainly use any small tablecloth and matching napkin for this step.
Next, I decided to go with sunflower-colored Fiestaware® for my dishes. It’s an earthenware product, which I thought was a nice touch with the rocks. I went with the square plate for subtle visual interest. The flatware has a simple pattern and works well with the gray.
The dessert plate is glass to keep the yellow of the dishes I used for plating most of the meal from being too dominant. The wine glass is just one I took from our cabinet.
Creative Attraction
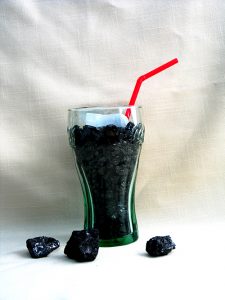
Right now, I’m working on a hamburger meal and having lots of fun with it. One of the elements I’ve finished is the beverage; it’s “Coke-a-Coala”. That’s not a misspelling. My beverage is literally made of coal; anthracite to be exact. I chose anthracite because it is very hard and very shiny. I had to order some from the East Coast because we don’t have coal furnaces in my part of California. I was fortunate that, when the dealer heard what I was going to do with it, he let me purchase a few pounds instead of a 50-pound sack.
My thought was that, if I crushed the coal small enough, the shiny bits would make it look like the beverage was carbonated, and it worked! Crushing it wasn’t easy. I wrapped up the golf ball-size chunks in old kitchen towels and whaled away at them with a sledgehammer. If you do this, be sure to wear long sleeves, good gloves, and eye protection. As you crush it, the coal will tear through the fabric and sharp bits will go flying. (I found it to be a great way of working out frustration.)
I ordered a set of authentic Coke® glasses online and made a few ice cubes with selenite.
Thirsty anyone?
As you can see, none of what I did is very difficult. If you can make
cabochons, you can create a rock meal to show off at your club and in shows.
Finding just the right rocks can be time consuming, especially since I work to get the scale, color and shape just right. I also like to listen to my rocks, and they often tell me what they want to be. Those of you who listen to your rocks will understand.
I haven’t made any secret of my meals, and I’ve been delighted when others give rocks to me and tell me what they see in them. When you start doing this, you’ll find that others will do the same for you.
I promise you that, once you start keeping an eye out for rocks that remind you of food, you’ll never look at a discard pile the same way again, and your lapidary friends will always be asking you what you’re up to now.
About the contributor: Donna Albrecht is a writer and blogger in Northern California. Visit her at www.LapidaryWhisperer.com.


