
Turquoise jewelry and the stone itself have been long-time favorites for me, so I set out to make a cuff bracelet inlaid with Kingman spiderweb turquoise. I fabricated the bracelet using 14K white gold with 18K yellow gold trim. It is now on display through a long-term loan with the University of Arizona’s Alfie Norville Museum.
What is Kingman Spiderweb Turquoise?
Kingman spiderweb turquoise is named after the Kingman Mine located in Arizona and is renowned for producing some of the finest turquoise in the world. What sets this turquoise apart is its spiderweb-like matrix pattern. This is created by the presence of minerals such as iron pyrite and manganese oxide and shows as dark veins crisscrossing the blue-green base color giving each stone a unique appearance.
Picking Out Turquoise Jewelry Stones
In 2015, I was driving through Arizona and stopped by Colbaugh Processing to buy spiderweb turquoise. The Colbaugh family has contract rights with Origin Mining Company to mine turquoise found in the large Mineral Park copper mine, in the Cerbat Mountains. Colbaugh’s Kingman Turquoise Mining Company is currently the only turquoise mine in the U.S. that mines year-round. The showroom is open to the public and the prices offered are the same as when they sell at the Tucson Show because they always sell at consistent prices.
I asked about natural turquoise, not stabilized turquoise and they brought out a tray of beautiful spiderweb nuggets. I picked through and selected some favorites to add to my collection of beauties.
Then at the 2017 Tucson Gem Show, I went to the Colbaugh Processing booth at the G&LW Holidome Gem Show. (The booth is set up at the entrance where no entry badge is needed.) I bought some additional nuggets and took them home to add them to my stash. Marty Colbaugh thinks it is some of the hardest, best turquoise they have mined there.
With my stash — I had 27 nuggets totaling 198 grams of rough to do the project; cost of the nuggets was $5.50 per gram or $2500 per pound — I decided to make turquoise jewelry; a cuff bracelet.
Fabricating the Turquoise Jewelry Bracelet
I started this turquoise jewelry project by making a copper blank to test for fit. Then I cut out a long 6”x2” oval blank from 20-gauge 14K white gold. I took some 14-gauge 14K white gold square wire and soldered it on top of the sheet. Following the outside edge of the oval, I soldered it an inch at a time using soldering tweezers to hold it in place. I bent the wire into position, soldered an inch, then repeated until it was soldered all the way around.
The next wire added was an 8-gauge 18K yellow square wire. The wire was rolled through a rolling mill to make it narrower in width and taller. The purpose of this wire was to give more depth for the inlay and to introduce the rich yellow of 18K. With the raised white gold border around the oval, I was able to fabricate an oval with the 18K that fit snugly inside the top edge of the oval. I soldered the 18K in place and did some filing and sanding cleanup.
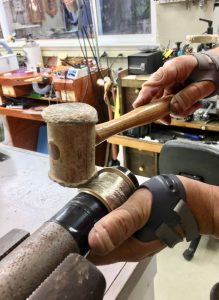
To shape the oval into the bracelet shape, I put a steel pipe into a vice and wrapped Gorilla tape around it. The tape protected the inside surface of the bracelet from being scratched by the steel. I hammered the gold oval over the steel pipe with a rawhide mallet, a type of hammer that leaves no marks on the gold.
I finished sanding the inside of the bracelet and the outside edges then took it to the polishing machine. I buffed the bracelet to a Tripoli polish to make sure there were no cracks or pits in the solder seams and the surface was smooth. I needed the tripoli-polished surface ready for a final rouge polish once the inlay work was done. I roughed up the interior of the bracelet top where the inlay was going with a grinding bur so the gold had a coarse surface where the glue would better adhere. The finished weight of the gold before doing the inlay work was 4.2 Troy ounces.
The Inlay Process
To begin the inlay work I cut flat sides on the turquoise nuggets with a 4-inch diamond saw.
I ground the edges flat and the bottom of each nugget to a concave surface that matched the surface curvature of the bracelet, with a Diamond Pacific Pixie using the 80-grit wheel. The top surface of each nugget was left natural.
I started by cutting three nuggets then gluing them on and continued by cutting no more than three at a time. To glue the nuggets, I first cleaned the surface of the metal and the nuggets with Acetone. The glue was Loctite SF 7075 along with the activator, Loctite AA 324. This is a very strong glue that only cures in the absence of air. I sprayed the activator on the surfaces then put on drops of glue and then placed the inlay pieces into position. After being held in place for a couple of minutes, the glue was set. Because this glue only sets in the absence of air, any extra glue does not set and is easily wiped away.
Since these were irregular nuggets and I had only concaved the bottoms just enough to fit them in place, there were gaps left between the nuggets and the gold. To fill these cavities and give support I filled these gaps with 5-minute epoxy. I used an exacto knife to cut the excess away and leave a clean surface to fit the next nugget.
Supplier List for MaterialsTURQUOISE Colbaugh Processing: www.kingmanturquoise.com GOLD AAA Precious Metals: www.aaametals.com LOCTITE GLUE: www.Amazon.com LAPIDARY EQUIPMENT Diamond Pacific Tool Corporation: www.diamondpacific.com STONE SURFACE GRINDING AND POLISHING Mountain Mist Products: https://mtmist.com |
When I started, it looked like I had a nice pile of spiderweb material, plenty to do this job and maybe some earrings to match. I used every one of the 27 nuggets with nothing left over. Just by chance, I had exactly what I needed to finish my design!
Filling the Gaps
The gaps between the inlay pieces on this turquoise jewelry piece were tight but visible. To fill them I needed fine turquoise powder so I took pieces of the leftover scraps and put them into the rock pulverizer to make powder.
I invented this pulverizer to create powder to be used with super glue to fill gaps in cracks. The mortar part is made from an 8-inch long piece of 2-inch plumbing pipe capped on one end. The pestle part is made from a 12-inch piece of 1-inch plumbing pipe capped on both ends. Pounding the pestle down on the rocks inside of the mortar pipe breaks the rocks up and creates a powder. This works equally well with harder stones like agate. For this job, I needed a very small particle powder to fit into the tight cracks of the inlay so I ran the powder through a fine enameling screen and ended up with a fine blue flour.
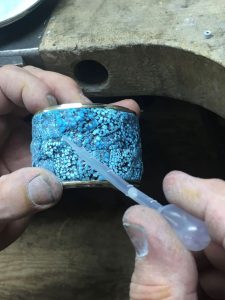
I went along inlay gap by inlay gap carefully filling them with the turquoise powder. Next, I used a plastic pipette to drop regular superglue onto the powder. This sets up into a stone cement that is strong and matches the color closely. I also did this along the outside edges in the gaps between the gold and the turquoise.
Final Polishing
I polished the top surfaces of the inlaid turquoise nuggets for a natural nugget look. Polishing it flat would have been beautiful, but it would have resulted in some thin areas for this piece of turquoise jewelry.
Polishing was done using a FlexShaft machine. I started with Mizzy heatless grinding wheels for rough grinding then went to Dedeco White Silicone wheels to smooth out the grinding marks, always following the contours of the nugget surfaces to keep the natural look.
After that, I went to Mountain Mist brand diamond polishing paste with stiff bristle brushes. I went through all six of the Mountain Mist diamond paste grits starting at 240-grit and ending with 14,000. This produced a beautiful polish on the turquoise. The final step was putting the last polish on the metal, going back to tripoli, and finishing with jeweler’s rouge.
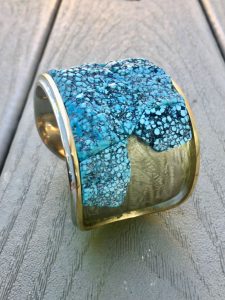
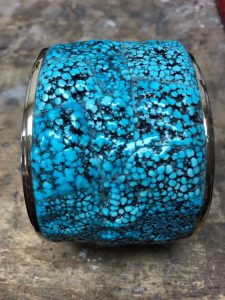
The final result for this turqoise jewelry project was a wide cuff bracelet with a center field of turquoise which looks like one continuous stone wrapped around the wrist.
This story about turquoise jewelry and how to make an inlaid bracelet previously appeared in Rock & Gem magazine. Click here to subscribe. Story by Bruce McKay.


